Monday 15 June 2020

Mirchi Bhajji - snack fit for winter

Mirchi bhajji wasn’t my cup of tea initially but certainly a popular South Indian or shall I say Andhra snack that husband enjoys. So what are they exactly? Deseeded long green chillies coated in besan (gram) flour batter and deep fried. Though they are crispy and nice, it is something I prepare once in a while and therefore, I want it a little more flavoursome. Thus, I opt for stuffed mirchi bhajjis.

Here’s how I prepare mirchi bhajji with potato filling.


  1. Peel potatoes, cut into cubes then boil them. Small pieces are cooked quickly compared to whole potatoes. One medium size potato should be enough for stuffing eight chillies.


2. Meanwhile wash the chillies properly then wipe them dry with a paper towel or clean cloth.


3. Slit open the chillies vertically in the middle.


4. Deseed the chillies using a teaspoon. I prefer to leave a tiny bit of seeds (usually at the top) to get the taste of chilli else it becomes too bland without the seeds.


5. When the potatoes are cooked, mash them with a fork or potato masher. (While my husband thinks I’m queen of kitchen gadgets, I don’t have a potato ricer. But if you have it, use it by all means.😆)


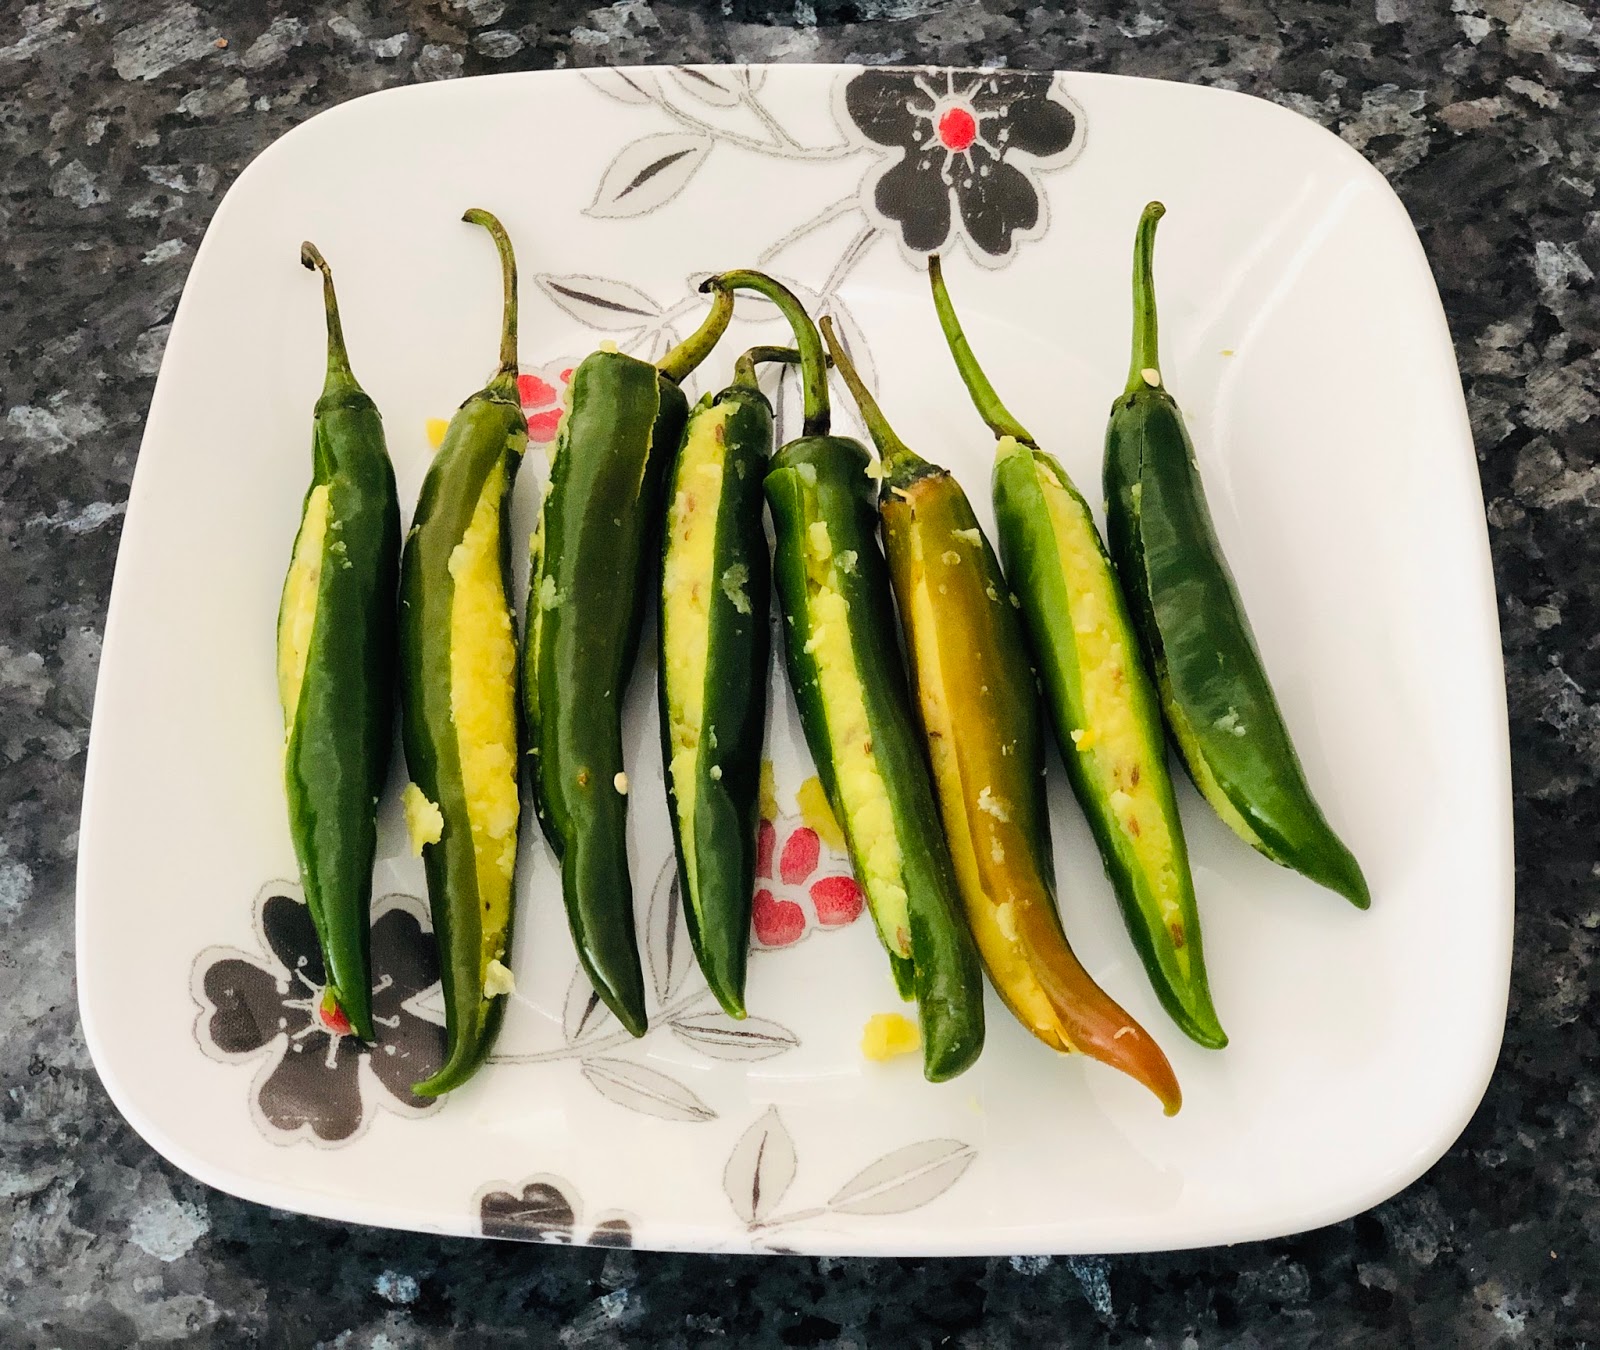
6. Add the following to the mashed potatoes - turmeric powder, salt, lightly roasted cumin seeds (jeera) and carom seeds (ajwain). You may add other ingredients that you prefer but I like it keep it simple. This is now ready to be stuffed in the chillies.


7. For the batter, I use besan (gram) flour and add some turmeric powder and salt to it. I also add little bit of rice powder / rice flour to make the snack crispy. But corn flour can be used for the same. You can add any further ingredients that you wish to, but as I said earlier, I like to keep it simple. For eight chillies, I’ve used about eight tablespoons of besan (gram) flour and one-two tablespoons of rice powder / rice flour. Mix all the dry ingredients well then add water slowly while mixing it with a spoon to form a thick batter. Make sure your batter is not runny. It needs to be thick enough for the chillies to be easily coated.


8. Heat oil in a pan for deep frying. Meanwhile fill the chillies with potato stuffing.


9. Dip the stuffed chilli in the batter, rotate it around, holding the stem of the chilli for an even coating. Make sure the batter covers the open side of the chilli else the potato stuffing can spill out and also oil will enter the chilli.

10. Make sure the oil is hot so that the chilli absorbs less oil. You can check this by adding a tiny bit of batter to it. Once the oil is hot, you can keep the pan on medium flame. Add the chilli to the hot oil. Repeat step 9 until the pan has enough chillies in it.


11. Once cooked to golden brown colour, strain the chillies and put them on paper towel on a plate to absorb excess oil.


If you happen to try this out, I hope you enjoy your mirchi bhajji.

Note: In the same way, you can fill the mirchis (chilies) with powder made out of roasted peanut, some grated then roasted fresh coconut flesh, along with roasted white sesame seeds as the main ingredients.

I like to experiment in the kitchen and these are the variations of mirchi bhajji I enjoy.

Sunday 31 May 2020

My inner engineering experience

I walked into inner engineering program to learn some yoga and meditation.

The sheer dedication of volunteers was something that could not be missed. I was amazed at how even the tiniest things were taken care of with so much attention and detail. But I also noticed some people bowing down to Sadhguru’s photo and I thought what the hype was all about.

As the program went on, I witnessed so many changes taking place within me. And on the final day of the program, I could not stop myself but join the queue, which was much more longer by now, to bow down to Sadhguru’s photo. Now, are you wondering what the hype was all about?

We were bursting with gratitude for what he had offered to us. Something that money could not buy and which was beyond happiness.

Since then I have been wanting to write about my experience and journey with Isha and Sadhguru. However, I could not get myself to do so. Reason being, I don’t think I could ever articulate myself well enough and do justice to what I have received. But today, I feel the urge to share a bit of my inner engineering experience. Today I’ve attempted to write a bit of my story, especially for those who have recently approached me about this.

So what did inner engineering and shambhavi practice give me?

To begin with, my regular headaches were gone instantly and so was my need for coffee and caffeine dependency. Soon I realised my temptation to have meat had disappeared and becoming a vegetarian came naturally with an ease. These are some of the things that people could see on the surface. But this is just the tip of the iceberg. How do I explain the subtle shift that has been happening within me? 

Some people say inner engineering has made them good at decision making; enhanced their attention span; made them calmer; and so forth. For me, it has been the turning point, life has picked up momentum since then! I feel I have lived for four years in the last two and half years of my life since inner engineering program. Little did I know back then that the “engineering” would go on happening in my life hereon. There is so much more to say but for now, I am going to leave it at this. 

I’d rather let people have firsthand experience than sound like I’m marketing some product. So if you are someone who has been thinking about inner engineering, the only way to know is by giving it a go. Consider how much you will lose? Think how much you could gain?

And when you finally decide to go for inner engineering program, it does not matter whether you go as a skeptic or as a student, just go with an open mind. I hope you do not deny yourself the opportunity that I gave to myself. And as Sadhguru says “Are you here to experience life or to think about it?”

The choice is yours to make. I hope you make a wise choice.

Monita.😊🙏


Saturday 9 May 2020

Mum's fried rice creation

Sharing here how my mum cooks fried rice - always with fresh vegetables!😆

Little bit of background
When my siblings and I were little, I recall mum being very creative in the kitchen. She would take pride in her cooking and would often experiment adding different ingredients or cook a particular vegetable in another way - her way. Sometimes I was the guinea pig but mostly the judge/critic/taster of her food creations. This was way before people could get cooking inspirations from the internet and tv. The culture of sharing actual food/meal with family, friends and neighbours was prominent back then as opposed to sharing still photos in today’s modern, fast, and hectic lifestyle.🙊

We used to have visitors almost all the time and the table would be full of a variety of dishes. Further, mum would often cook in large pots for the less privileged. As I grew up, I started helping her in the kitchen and have learnt a lot from my mum. This came in handy when I came to Australia as a student; and the same applies to my brothers.

Now as I sit back and reflect upon mum’s cooking, I have often enjoyed her meals but never documented it or preserved her food creations. Thus, as a little tribute to her hard work, I’m thinking of compiling mum’s cooking here (on the blog) whenever possible. I must also clarify that mother dear is not some renowned chef, but fondly a much loved cook in our family circle. From the warmth of my mum’s kitchen to your table, sharing here how I’ve learnt to make fried rice from my mum.

Ingredients:
  • Rice - long grain or jasmine 
  • Chicken - boneless, skinless chicken cut into small cubes - if you are opting for a chicken fried rice
  • Carrots - cut diagonally, long and thin
  • Bok choy - thinly cut, mostly the white stalks with some leaf on them
  • French beans - cut diagonally
  • Onions - cut into quarters and separate the layers
  • Capsicum - dice into cubes (use yellow, orange, & red for more colour)
  • Celery - remove strings by peeling then cut into small slices
  • Soy sauce - Pearl River Bridge Golden Label Superior LIGHT Soy Sauce and Pearl River Bridge Golden Label Superior DARK Soy Sauce. (You can also opt for a soy sauce of your choice)
  • Sesame oil
  • Olive oil
  • Ginger
  • Garlic
  • Salt to taste

Method:

Step 1 - if adding chicken
  • Marinate boneless, skinless chicken cubes with light soy sauce and fresh ginger and garlic paste. Be generous with the paste. The quantity of chicken depends on your liking. One chicken breast or thigh piece would be enough for 2-3 servings of fried rice. Cover and marinate in the refrigerator for 30-60 minutes. 

Step 2 - rice prep
  • Cook rice either over stove top or in a rice cooker. (2 cups would make 4-5 servings of fried rice, depending on how much vegetables you add.)

Step 3 - cook the chicken (if using)
  • Add little olive oil to a pan and cook the marinated chicken. Add salt to your liking, noting that soy sauce also has a lot of salt. Fry on low to medium heat until the meat loses all liquid and is golden brown in colour.

Step 4 - sauté the vegetables
For this mum often uses an electric frying pan or else a wok.
  • In a wok, add 1/2 tspn of olive oil (or lightly spray can olive oil), then add carrots and lightly toss for 2-3 minutes, cooking only until they are tender -crisp (slightly crunchy.) Optional - sprinkle just a tiny amount of salt to enhance the taste, be mindful you’ll be adding soy sauce later which is quite salty. Remove the carrots from the wok.
  • In the same wok, repeat the above process with French beans. Spray or drizzle little olive oil as required. This may require a few extra minutes to cook compared to carrots. Like with carrots, adding little salt is optional. Remove the French bean from the wok when slightly crunchy.
  • In the same wok, repeat the above process with bok choy. Spray or drizzle little olive oil as required. This may require less cooking time then compared to carrots. Again salt is optional. Remove from the wok when slightly crunchy.
  • In the same wok, repeat the above process with onions. The oil coating on the wok may suffice but you can spray or drizzle little olive oil if required. Do not add any salt to this as it will make the onions soggy. Toss this only for a minute or less, removing it from the wok when onions are still crunchy.
  • No need to sauté celery and capsicum; at least mum doesn’t.

Step 5 - stir-fry the rice
  • Add a tiny bit of oil in a pan (you can use same wok used for veggies or a skillet.)
  • Add fresh ginger and garlic paste, sauté it lightly. (This is optional if you are using chicken and already added ample ginger and garlic to it when marinating. Be generous with the paste if preparing vegetable fried rice.)
  • Add rice and stir-fry it on medium to low heat for several minutes, this will enhance the taste of otherwise plain boiled rice.
  • Once rice is fried, add both light and dark soy sauce. A tiny bit of dark soy sauce will go a long way.

Step 6 - Add cooked chicken (optional)
  • If using chicken, combine rice and chicken at this point. You can keep the heat on low flame.

Step 7 - Add cooked vegetables
  • Add all the vegetables to rice and switch off the flame.
  • Toss well; taste to adjust salt or sauce as per your liking.
  • Drizzle some sesame oil right in the end for extra flavour and a nice aroma.

Finally, your fried rice is ready and you can serve it fresh while the vegetables are still crunchy.

This is a meal in itself however, you can have it with cucumber slices, salad of your choice or one of the following sauces on the side - tomato sauce, chilli sauce, thinly sliced onions dipped into Pick Me Up Worcestershire sauce.

Here’s a photo of the cooked veggies, the vegetable fried rice that I made, and mum’s chicken fried rice. You can see that her fried rice does not have any shortcuts as mine (esp. when frying the rice). We enjoyed ours, hope you enjoy yours too!🙏


Apart from celery and capsicum, the rest are cooked vegetables (below).


Vegetable fried rice I made. This has basmati rice as I didn’t have any other white rice at home. Also, it has very minimal light soy sauce and no dark soy sauce.


Finally, below is the chicken fried rice cooked by mum. My son loves it and so do my brothers. Remember, the quantity of the ingredients depend on your liking but if you follow the method/technique and add fresh vegetables, chances are you’ll love it too!😊

Friday 24 April 2020

Oats - make it your business

Oats doesn’t have to be plain or boring. In fact, be it oats or bitter gourd, how I feel about food is, you’ve got to make it yours to experience its magic.

Yes, I’ve finally taken my first step towards archiving my food creations/recipes. In fact, there’s so many things that I’ve been wanting to blog about. However, given my current circumstances, time constraints, and the fact that I spend a fair bit of time in the kitchen these days, which I enjoy, I’m happy to share my food blog with anyone interested.


Today, I’m sharing one of the ways I prepare oats and it doesn’t require any cooking. This style is fondly know as overnight oats. In case you want to give this oats a try, I encourage you to follow your instincts, tastebuds and go all creative! I’m also mindful that some of you may already be having this for breakfast. In which case, please feel free to share any useful tips or creative ideas that you may have.


Now let’s get started....


Ingredients:

  • Rolled oats
  • Milk or yogurt of your choice
  • Any natural sweetener

The following can be optional but I always add these:

  • Chia seeds
  • Spices (cinnamon, cardamom, and nutmeg powder)

Optional items:
  • Nuts (walnut / almond / Brazil nut etc.)
  • Fruits (mango / fresh berries / coconut flakes etc.)
  • Seeds (flax seeds / sunflower seeds / pumpkin seeds etc.)
  • Natural vanilla extract (not imitation vanilla)
  • Pure saffron (in which case, do not add vanilla extract)
  • At times you may replace chia seeds with sweet basil seeds (aka sabja seeds/tukmalanga) if you want to.

Method:
  • Basically, soak oats in milk or yogurt and leave it in the refrigerator overnight. Add chia seeds, sweetener, and spices to the mixture before refrigerating it. The same applies if using vanilla or saffron.
    • In the morning, add any of the optional items (fruits, nuts, seeds) that you may prefer or have it as it is.

    Following might be useful:
    • Oats - I won’t recommend trying this method with steel cut oats as it requires to be cooked thoroughly, at least in my opinion. I’m not a fan of quick oats or instant oats. Thus, I  prefer old-fashioned rolled oats for refrigerating.
    • Milk - as per your preference - such as full cream/skim/lactose free cow’s milk, soy milk, almond milk, coconut milk etc.
    • Yogurt - I use this occasionally, and I generally prefer vanilla yogurt with oats over plain, Greek or other flavoured yogurts. However, you may add whichever yogurt you like with oats.
    • Natural sweetener - you can use one of the following - good quality honey, pure maple syrup, stevia, powdered jaggery, or finely chopped/ground dates. I like to switch between all of these for the sake of having a variety of taste and when using dates,  I prefer medjool dates over other varieties. If you want to use sugar, maybe it’s worth noting that raw sugar is a better choice over refined/white sugar.
    • Fruits - I prefer not to add fruits that require longer time to chew such as chopped apple and dried apricot.
    • Quantity - I do not worry too much about the quantity of milk or yogurt, I just add bit more milk/yogurt to the mixture in the morning if it gets too thick. Oats with yogurt mixture tends to get very thick and so I use less oats or more yogurt. After one attempt of preparing this, you’ll figure out the right portion for you and the quantity of oats and milk/yogurt as per your liking. In case you end up preparing bit more than required, you can have it the following day provided it remains in the refrigerator; it doesn’t go off that quick. The rest of the ingredients can be added as per your taste. Keep in mind that chia seeds expand in liquid so a little goes a long way. You can start with the ratio of 1/2 cup of oats with 1/2 cup of milk or 3/4 cup of yogurt and adjust the consistency in the morning as per your liking. Similarly, you may add 1 teaspoon or 1 tablespoon of chia seeds. The quantity of fruits and whether you add nuts will also determine how filling this breakfast is for you. From the photos below, you can notice I prefer bit more liquid over thick oats mixture usually sold outside.
    • Time saving tip - depending on whether I’m planning to eat it at home or take it to work with me, I prepare and store the mixture in an appropriate bowl or container to avoid transferring it to something else in the morning.
    • To heat or not to heat - in case it’s a cold morning and I haven’t used the yogurt, I just heat the oats with milk mixture in the microwave before adding fruits/nuts. Nonetheless, this is a rare occurrence and I do not prefer having microwave breakfast on a daily basis. Whilst I’m not much fond of cold food items, I prefer this during summer. In cooler season, I opt for traditional stove top porridge where possible. I have my own version that I may share some other time.
    • Oats may not be suitable for people who have gluten intolerance. Well, these folks would know it better. Other than that, oats is considered quite healthy which you could research if interested. With the competing priorities at home, I just can’t be bothered to do the extra work of researching then referencing and footnoting the sources here.

    Bit of background

    This is inspired by oats/breakfasts I’ve bought near my workplace in the past, combined with a lifestyle that doesn’t allow me leisure kitchen time. In addition, since I’ve become a vegetarian two and half years ago, I try to prepare my own meals where possible. This leads me to experiment more in the kitchen, with the limited time I get. Thus, I have not stolen or plagiarized someone else’s recipe here, just thought to make it clear.

    I must also add from personal experience, that oats consumption is one of the natural, safe, healthy, and easy ways I boost milk supply as a nursing mum. It has worked for me in the past too. Well, this reminds me to clarify that I am not a trained chef, nutritionist, or in any profession related to food and health. I therefore do not intent to give unsolicited advice. Please apply common sense and be a little kind to yourself and to me.


    Finally, since I haven’t been a big fan of clicking photos of each of my meals, here’s a handful of the variations from sometime back. You can explore different toppings and get as creative as your tastebuds would allow. I hope you enjoy your creation!😊


    That’s all from my akshaya patra for now. Passing good vibes over to you all.

    May peace, light and love be with you.

    Monita.🙏

    Saturday 6 February 2016

    Guest Writings

    Please refer to 'Guest Contributors' for details of below guest writers - 


    Guest Contributors

    Guest Contributors on the blog
    (For their articles, please see 'Guest Writings' - http://monitamala.blogspot.com.au/2016/02/guest-writings.html

    Ms Naina R Ghela
    Officially Joined: 02.02.2016.

    Hello all! With great pleasure I introduce Naina R Ghela as a guest writer on the blog. I came to know her through a common friend who noticed that we have some similar interests and thus introduced us. I am thankful to him and grateful for having known Naina.

    Few months back when I came across some of Naina's writings, I asked for her permission to share it on the blog. Her written expressions and conversations often remind me of the ancient wisdom and universal knowledge. Today I have the privilege to welcome Naina on board the blog - Just My Thoughts!

    Together we are looking forward to sharing many of Naina's writings accompanied with her brother; author Paresh M Jivanji's original artwork! We hope you will be able to take away something positive from our end.

    About Naina in her own words:
    In the dream of life, I'm a character that is somewhat shy, utterly crazy at times and solitary at others. A character whose life is strewn with periods of great happiness and joy over achievements and acquisitions and also times of great sorrow and dejection over numerous failures. Never has an ego endured so much pounding and so many knock backs. Yet so much grace.

    In reality, I am that in which the dream occurs, where there's no me or you, just This, what Is! My muses and writings come from that nothingness that is everything; an outpouring of love.

    Monday 21 December 2015

    Chocolate box - full of your favourites!

    Today, please permit me to talk about a box. An ordinary box to you but to me it is my treasure box (in making). Yes, I'm talking about my blog that holds bits and pieces of my thoughts and thus, is a part of me.

    A few people are in the vicinity of this box, but life is fast moving, busy, demanding and challenging so who out of the minority would care to bother what's in someone else's box? Especially, when talking about someone like me – a chatterbox. Hence what's the purpose in possessing this box? There's a probability that it may be of use to someone out there, but that I cannot be sure. Yet I continue to put my reminders, post it notes, to do lists, hobbies, essays, positive thoughts and various little joys there. Reason being, it serves me and acts as a stepping stone towards my higher purpose. Who knows, at times when I may feel less of myself, I could go to my box and get out more of my better self and stick it onto me. It will surely help me pick up myself and move on. And anyway that box has a lot of me in it. I think that box will give my loved ones access to me when I will finally get into 'the other box' at the end of my life story.

    If you haven't understood any of it and feel that I've confused you and wasted your precious time talking about some box nonsense, please dance away. Don't box and cause me a virtual black eye! I am very much aware that sometimes I appear to talk in riddles. However, for those who are still with me and my box, it is time you keep a box too. I don't mean you start boxing, blogging, weather reporting or posting quotes like I do. I mean do more than that. Do what resonates with you, refines you, and restores you. Put into your box your goals, ideas, hobbies, passion etc. whether it is an indoor activity, outdoor sports, health regime, business endeavour, travelling, writing, programming, styling, baking, dancing, parenting, painting, learning a new language, yoga or cooking classes to name a few. Whatever it is, it needs to go into that box. The only criterion is that it needs to be something positive, that complements you and adds meaning to your existence. Because when you'll finally retire, pay off the mortgage for your investment property and marry your kids off, this box will be your companion - your mind massage system. And for your loved ones, it will be a mini clone of you.

    This is talking ahead. No one has seen the future but we have today and to make it better than yesterday, I urge you to create and maintain this box to reduce stress and increase vitality, joy and all things fun. So get up and grab your ideas, dreams and visions. It has the potential to take you on life's amazing hidden journey. You have the power to create that magic box and it is not too late to begin.

    I have presented a box to you in the form of my blog. Now it's time you see your own box. When you'll be too old or wise to enjoy any material possessions, this box will be the only treasure that you may desire. It's the real making of legacy for your children and the next generation. Get started and keep going. Excited? I am! And that's more than enough boxing for now. While it is easy to lead a busy packet soup type life, you put into your box some authentic soup to nurture, heal and share with yourself and all. I hope you experience the joy and peace you are meant to through this.

    May peace, light and love be with you.


    Monita.


    Friday 6 November 2015

    You Are Not An Illusion

    What people see and know of me is superficial. I am none of these illusions! Then who am I? 

    I am a tiny star amongst uncountable that are spread across the many galaxies. And this isn't just my story. It is true for all of us as we are all interconnected.

    How mesmerizing it is when you think about it! Yet most of us pass over this realm clinging to a narrow thought pattern, too engrossed into one temporary life and believing this one dimensional view to be the absolute reality. The soul laments at this and keeps returning in different vessels with the hope that we will unveil the truth one day. Unaware of this, we mourn at the death of the human body.

    Now let me kindly ask, who are you? To say you are your name, gender, age, domestic and professional roles, race, ethnicity, religion, social and marital status and so on would be an understatement. This merely describes you. So, WHO are you? Think about your real self, open your eyes to the bigger picture. None of us took birth by chance, there's a broader objective behind us choosing to turn our formless self to the form we currently possess. Let's recall this, experience peace, and get a glimpse of heaven here and now.

    May peace, light and love be with you.

    Monita.